

Do you face challenges with breastfeeding?
Nipple shield breastfeeding might solve your problems if traditional methods don’t work. These thin, silicone accessories help you overcome common breastfeeding difficulties while your baby enjoys skin-to-skin contact benefits.
Nipple shields aren’t permanent solutions for breastfeeding. They serve as temporary aids to address serious latch problems. Research confirms that milk consumption increases among premature babies using nipple shields. These tools prove beneficial for small or ill babies who struggle to learn breastfeeding.
A nipple shield can rescue you from challenging situations, but proper usage under guidance matters. Your milk supply could decrease if you use it long-term without monitoring. Understanding the right time and method to use a nipple shield is vital for your breastfeeding experience.
This guide covers everything about nipple shield breastfeeding. You’ll learn what they are and how to safely wean your baby off them at the right time. Let’s help make your breastfeeding experience easier and successful!
Step 1: Understand What a Nipple Shield Is

Step 1: Understand What a Nipple Shield Is
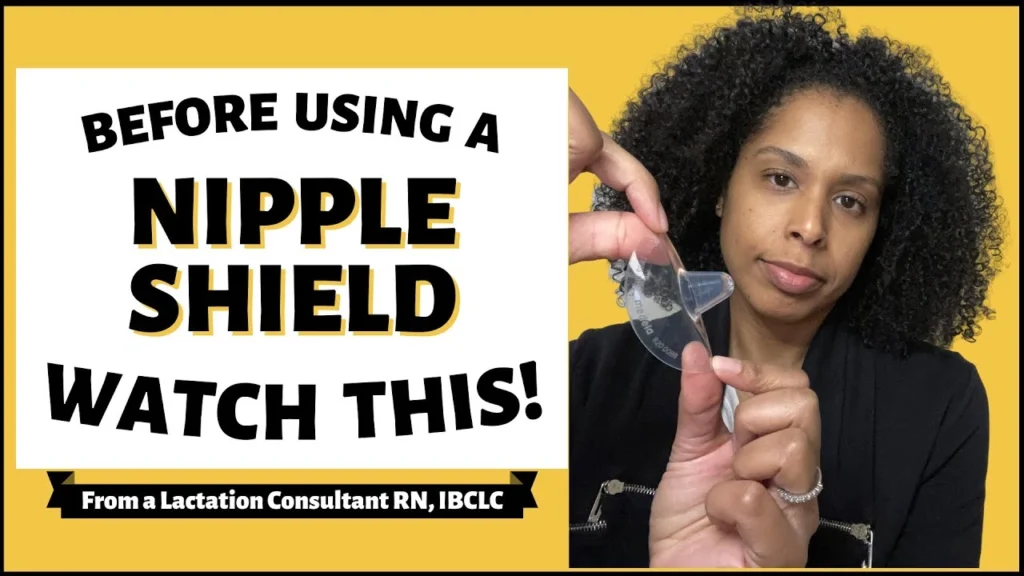
Your breastfeeding trip might need some helpful tools. A nipple shield stands out as one of these tools. This thin, flexible silicone device covers your nipple and areola during breastfeeding. It works between you and your baby to create a well-laid-out surface for your baby to latch onto.
What it looks like and how it works
Nipple shields have changed substantially over time. Modern nipple shields use ultra-thin, soft, and transparent silicone, unlike historical versions made from silver, wood, lead, and animal skins. You can see through them easily, making feeding more comfortable.
A nipple shield has these parts:
- A base that wraps around your areola (the skin surrounding your nipple)
- A cone-shaped area where your nipple fits
- Tiny holes at the tip letting milk flow to your baby’s mouth
- Some designs let you have more skin-to-skin contact
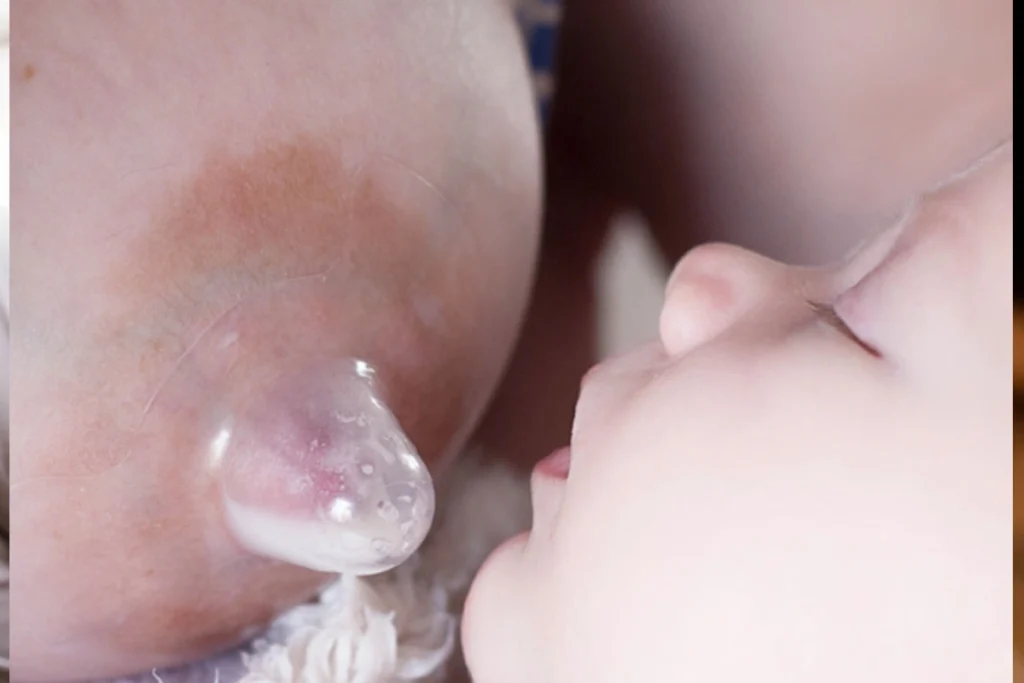
Think of a nipple shield as a “second nipple” over your own. Your nipple sits inside the shield’s tunnel when positioned right. The shield makes an extended, firmer nipple shape so your baby latches better. Milk flows from your breast through tiny holes at the tip straight to your baby’s mouth.
The right placement makes all the difference. Center the shield over your nipple and rotate it gently clockwise to guide your nipple into the tunnel. Each stretch pulls more nipple tissue inside. A few water drops can help secure the shield’s edges over your areola.
How it helps with breastfeeding challenges
Nipple shields solve many breastfeeding problems. They help babies who don’t latch well. The shield’s longer, firmer surface touches your baby’s mouth’s roof and gets the sucking reflex going.
Moms with flat or inverted nipples find these shields helpful. The shield lengthens and firms up your nipple, making it easier for your baby to grab hold. Good latching matters because it helps transfer milk and keeps feeding pain-free.
Premature or weak babies often need nipple shields. These little ones might not create enough suction or keep a deep latch. Studies show premature babies drink more milk with nipple shields.
These shields also help with:
- Babies who have tongue or lip ties that block proper latching
- Switching babies from bottle to breast, since the shield feels like a bottle nipple
- Moms who have an overactive let-down reflex by controlling milk flow
- Sore, cracked, or bleeding nipples from poor latching, but finding why it happens stays important
Remember that nipple shields offer temporary help. Most lactation experts want you to use them with professional guidance. The goal remains direct breastfeeding without the shield.
Step 2: Know When to Use a Nipple Shield
The right timing to use a nipple shield can make a big difference in your breastfeeding experience. These silicone devices won’t solve every nursing challenge, but they can be very helpful temporary solutions in specific situations.
Premature or weak baby
Premature babies have a tough time breastfeeding because their suction pressures are lower than full-term infants. They find it hard to pull your nipple into their mouth and stay attached during feeding.
Studies show that nipple shields can help with these lower suction pressures. Babies drink much more milk with them. To name just one example, see how infants drank an average of 18.4 ml of milk with a shield versus just 3.9 ml without one.
Your baby can pause and breathe without repositioning because the shield keeps your nipple extended. This helps a lot since research shows premature babies breathe better and maintain better oxygen levels while breastfeeding compared to bottle-feeding.
Flat or inverted nipples
A flat nipple stays smooth against breast tissue, while an inverted nipple pulls below the surface with stimulation. Both types make it hard for babies to latch well.
The shield creates a clear shape for your nipple that helps your baby latch better. It holds your nipple in an extended position that works well for breastfeeding, even if your natural nipple shape tends to be flat or inverted.
Your baby can feed better without struggling to stay latched on a nipple that doesn’t stick out enough naturally.
Tongue or lip tie
Babies who have tongue or lip ties often can’t latch well. These mouth restrictions stop them from creating good suction or pressing the breast correctly during feeding.
The shield provides firmer stimulation at your baby’s mouth’s roof where soft and hard palates meet. This helps trigger the sucking reflex and makes nursing more effective despite the restriction.
This works as a short-term fix while you and your healthcare providers deal with the underlying tie.
Overactive let-down reflex
Milk that flows too fast and forcefully from your breast can make your baby gag, choke, or pull away during feeding. This is called an overactive let-down.
The shield can slow down the sprays of milk effectively. Small holes at the shield’s tip control the flow rate, so your baby handles the milk better.
Your baby won’t feel overwhelmed by the milk flow, which makes feeding time better for both of you.
Note that nipple shields work best as temporary solutions. Lactation experts suggest using them with professional guidance and planning to return to direct breastfeeding once you’ve addressed the specific issue.
Step 3: Learn How to Use a Nipple Shield Safely
The right technique is a vital part of successful nipple shield breastfeeding. These shields need specific handling unlike other breastfeeding accessories. You want them to help, not hurt your nursing relationship.
How to apply it correctly
Success starts with proper shield application. Clean your hands really well before touching the shield. Turn the shield partially inside out and leave a small dimple where your nipple will go. Put this dimple right over your nipple, then stretch the silicone base gently over your areola.
Here’s how to create a better seal:
- Get the shield’s edges wet with warm water before putting it on
- Add a tiny bit of lanolin ointment around the outer edge if needed
- Make a few clockwise turns to draw more nipple tissue into the tunnel
Your nipple should reach into the tip without touching the sides. The base needs to feel snug against your areola. You might need to adjust the shield during feeding if milk or saliva makes it slip.
Tips for encouraging baby to latch
Some babies need extra help even with a well-positioned shield. Try adding a few drops of expressed milk into the shield before offering it to your baby. This gives them an instant reward when they start sucking.
More importantly, position matters. Your baby should open wide before latching. Their mouth needs to cover the whole shield with lips spread around the areola instead of just sucking the tip. You’ll see breast movements beyond the shield during sucking if your baby has latched properly.
Look for these signs of proper shield use:
- Regular swallowing sounds and movements from your baby
- Pain-free feeding without pinching
- Shield stays smooth without dents during feeding
- Milk appears in the shield after your baby releases the breast
When to remove the shield during feeding
Nipple shields work best as temporary tools. Taking them off at the right time helps move toward direct breastfeeding. Start nursing with the shield for a few minutes, then try removing it mid-feed unless your healthcare provider says otherwise.
Your baby’s relaxed but active nursing state makes a perfect time to attempt shield removal. Break the latch gently by sliding your finger between your baby’s gums and the shield. Remove the shield quickly and guide your baby back to the breast.
Put the shield back on and try again later if your baby refuses to continue without it. It’s worth mentioning that most babies do better with gradual changes. Start each feed with the shield, then remove it earlier in following sessions until they don’t need it anymore.
Step 4: Get the Right Fit and Care for Your Shield
The success of breastfeeding with a nipple shield depends on finding the right size and taking good care of it. Let’s help you pick the perfect fit and learn how to maintain your shield.
Choosing the correct size
Nipple shields are available in different sizes and measure in millimeters, ranging from 15mm to 36mm in diameter. Your nipple diameter determines the right size—not your areola size. The best way to find your fit is to measure your nipple’s width at its base. Most manufacturers suggest your nipple should sit comfortably inside the shield’s tunnel with about 2mm of space on each side.
Here’s how you know you have the right fit:
- Your nipple should move into the tunnel without touching the sides
- A larger size might help if your nipple rubs the sides or hurts
- You might need a smaller size if your areola gets pulled into the tunnel with your nipple
Some moms need different sized shields for each breast. What works for one breast might not suit the other.
Cleaning and storing your nipple shield
Your baby’s safety depends on keeping the shield clean. Boil your new shield for 15 minutes before you first use it. After each feeding, follow these steps:
- Start with a cold water rinse to remove milk residue
- Wash with hot, soapy water
- Give it a good rinse with clean water
- Let it air-dry or pat it dry with a clean paper towel
You can also clean it in your dishwasher’s top rack on a hot cycle. Between uses, keep your clean, dry shield in a covered container or sealed plastic bag to keep it sanitary.
Signs your shield needs replacing
You should get a new shield when you notice the first signs of wear. Keep an eye out for:
- Tears or cracks in the silicone
- Sticky or tacky spots that cleaning won’t fix
- Discoloration or cloudiness that stays
- Any damage to the milk flow tip
Just like bottle nipples, your shield might need replacement even without visible damage if you’ve used it for a long time.
Step 5: Wean Off the Shield and Monitor Progress
Step 5: Wean Off the Shield and Monitor Progress
Nipple shields work best as temporary solutions. Your baby will continue receiving optimal nutrition while protecting your milk supply through a gradual transition back to direct breastfeeding.
How to transition back to direct breastfeeding
A successful weaning journey needs patience and the right approach:
- Offer your breast without the shield when your baby feels sleepy or between feedings
- Start with the shield, then remove it mid-feed when milk flows well
- Express milk before latching to give an immediate reward
- Let skin-to-skin contact strengthen your nursing bond
- Use your fingers to shape your breast into a more “shield-like” form
Your baby might get frustrated at times. Simply put the shield back on and try again later. A rushed process could create negative associations with breastfeeding.
Tracking baby’s weight and milk intake
Your baby’s nutrition needs close monitoring during this transition. Look for these signs:
- At least six wet diapers daily
- Visible milk transfer during nursing
- Regular weight checks with your healthcare provider
When to ask help from a lactation consultant
A lactation consultant (IBCLC) can help if:
- Your baby’s weight gain slows
- Nipple pain persists
- Weaning attempts fail repeatedly
- You need a tailored transition plan
Most babies make a successful transition from nipple shields with the right support.
Conclusion
Nipple shields are a great way to get help at the time breastfeeding challenges arise. This piece shows how these thin silicone devices help overcome issues like inverted nipples, premature babies with weak sucking reflexes, and babies struggling with proper latching. On top of that, proper sizing, application techniques, and regular cleaning ensure both safety and effectiveness.
These shields work best as temporary solutions rather than permanent fixtures in your breastfeeding experience. A transition plan with gradual weaning attempts will help your baby nurse directly at the breast. Most babies adapt successfully with patience and consistent practice, especially when you have moments where your baby is relaxed yet still actively nursing.
Weight monitoring is a vital part of this whole process. Regular pediatrician visits and tracking wet diapers will confirm your baby’s adequate nutrition. Without doubt, asking a lactation consultant for help can make this experience substantially smoother, especially when you have persistent difficulties during weaning.
Breastfeeding challenges might feel overwhelming initially. The right tools and knowledge will help you overcome them. The bond formed during these feeding sessions goes way beyond the reach and influence of nutrition alone. Nipple shields might be part of your breastfeeding story for a while, but they don’t define it—they simply help you write the chapters where you and your baby learn together. Trust the process, celebrate small wins, and remember each day brings you closer to confident, shield-free breastfeeding.
FAQs
Q1. What is a nipple shield and when should I use one?
A nipple shield is a thin, flexible silicone device that covers your nipple during breastfeeding. It’s typically used for premature or weak babies, flat or inverted nipples, tongue or lip ties, or when dealing with an overactive let-down reflex. However, it’s meant as a temporary solution and should be used under professional guidance.
Q2. How do I properly apply a nipple shield?
To apply a nipple shield, first wash your hands. Turn the shield partially inside out, leaving a small dimple at the end. Position this dimple over your nipple, then gently stretch the base over your areola. Moisten the edges with warm water for a better seal. Your nipple should extend into the tip without touching the sides.
Q3. How do I choose the right size nipple shield?
Nipple shields come in various sizes, typically ranging from 15mm to 36mm in diameter. To find the right fit, measure your nipple’s width at its base. Your nipple should fit comfortably inside the shield’s tunnel with about 2mm of space on each side. If your nipple rubs against the sides or causes pain, try a larger size.
Q4. How often should I clean my nipple shield?
Clean your nipple shield after each feeding. Rinse it with cold water first to remove milk residue, then wash thoroughly with hot, soapy water. Rinse well and air-dry or pat dry with a clean paper towel. Store it in a covered container or sealed plastic bag between uses to keep it sanitary.
Q5. How can I transition my baby from using a nipple shield to direct breastfeeding?
To wean off the shield, start by offering your breast without it when your baby is sleepy or between feedings. Try removing the shield mid-feed when milk is flowing well. Express some milk before latching to provide an immediate reward. If your baby becomes frustrated, reapply the shield and try again later. Be patient and consistent, and consult a lactation specialist if you need additional support.


