

Introduction:
how did nail art become the biggest beauty trend?
Nail art’s rise to becoming the biggest beauty trend can be attributed to its versatility, creativity, and social media influence. What began as simple color variations evolved into intricate designs, ranging from geometric patterns to miniature landscapes.
Social media platforms like Instagram and TikTok provided a platform for nail artists to showcase their work, inspiring millions worldwide to experiment with their nails. Additionally, advancements in nail care products and techniques made it more accessible for people to try at home. The fusion of artistry, technology, and accessibility propelled nail art to the forefront of the beauty industry, captivating enthusiasts of all ages.
In recent years, nail art has emerged as a vibrant and expressive form of self-expression. From intricate designs to bold patterns, the possibilities are endless when it comes to decorating your nails.
Whether you’re a seasoned nail artist or a beginner looking to explore this creative outlet, this guide will provide you with tips, tricks, and inspiration to master the art of nail art.
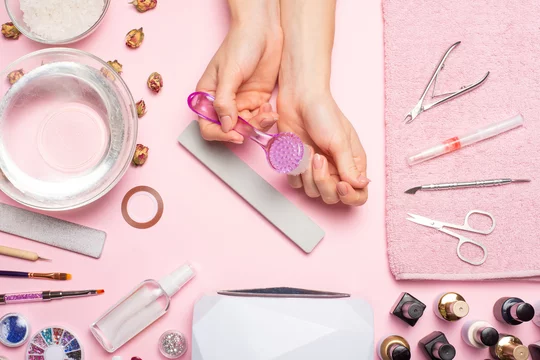
Tools of the Trade:

Before diving into the world of nail art, it’s essential to have the right tools. Here are some basic supplies you’ll need:
1. Nail polish in various colors.
2. Nail art brushes in different sizes.
3. Dotting tools for creating dots and circles.
4. Striping tape for clean, straight lines.
5. Nail stencils for intricate designs.
6. Rhinestones, studs, and other embellishments.
7. Base coat and top coat for a long-lasting finish.
Getting Started:
Start by preparing your nails. Trim and shape them to your desired length and file the edges for a smooth finish. Apply a base coat to protect your nails and help the polish adhere better.
Basic Techniques:

1.Marbling:
Apply drops of different colored polishes onto a surface and swirl them together with a toothpick. Dip your nail into the mixture for a marbled effect.
2.Gradient:
Apply two or more colors onto a makeup sponge and dab it onto your nails for a seamless gradient look.
3.Stamping:
Use a stamping kit to transfer intricate designs onto your nails. Apply a layer of polish to the design plate, scrape off the excess, and use a stamper to pick up the design and transfer it to your nail.
4. Freehand:
Use nail art brushes to paint designs directly onto your nails. Practice steady strokes and have a steady hand for more intricate designs.
Inspiration and Ideas:
Draw inspiration from various sources such as nature, fashion, art, and pop culture. Experiment with different color combinations, patterns, and textures to create unique looks. Consider themes like seasons, holidays, or special occasions for themed nail art.
Tips for Success:
– Practice makes perfect, so don’t get discouraged if your first attempts aren’t perfect.- Invest in quality nail polish and tools for better results.- Use thin coats of polish to prevent clumping and ensure faster drying.- Seal your designs with a top coat to protect them and prolong their lifespan.- Get creative and don’t be afraid to try new techniques and styles.
Care:
Here are some tips for nail care:
1. Keep them clean:
Regularly wash your hands and nails with a gentle soap to remove dirt and bacteria.
2.Moisturizer:
Apply hand cream or nail oil to keep your nails and cuticles hydrated. Dryness can lead to brittleness and breakage.
3. Trim and shape:
Trim your nails regularly to prevent them from getting too long and breaking. Use a nail file to shape them gently.
4. Protect:
Wear gloves when doing chores or using harsh chemicals to protect your nails from damage.

5. Avoid harsh products:
Acetone-based nail polish removers can be drying. Look for acetone-free removers or ones with added moisturisers.
Eating a balanced diet rich in vitamins and minerals can promote healthy nail growth. Consider adding biotin, a B vitamin, to your diet, which is known to improve nail health.
7. Limit gel and acrylic nails:
While these can be great for special occasions, frequent use can weaken your natural nails.
8. Let them breathe:
Give your nails a break from polish occasionally to prevent discoloration and allow them to recover.
By following these tips, you can ensure that your nails stay healthy and beautiful, providing the perfect canvas for your nail art creations.
There are many types of nail art techniques, each offering a unique way to decorate and embellish your nails.
Here are some popular types:
1. Nail Art:
This technique involves painting designs directly onto the nails using nail art brushes. It allows for intricate and detailed designs.
2.Stamping Nail Art:
Stamping plates are used to transfer intricate designs onto the nails. Nail polish is applied to the design plate, scraped off, and then picked up with a stamper and transferred to the nail.
3.Marble Nail Art:
Marble nail art involves creating a marble-like effect on the nails by swirling together different colored nail polishes on a surface and then transferring the design onto the nails.
4.Gradient Nail Art:
Gradient nail art, also known as ombre nails, involves blending two or more colors together on the nails to create a seamless gradient effect.
5.3D Nail Art:
3D nail art involves adding embellishments such as rhinestones, beads, and charms to the nails to create a three-dimensional effect.
6.French Tip:
A classic nail art style, French tips involve painting the tips of the nails white or a contrasting color and leaving the rest of the nail natural or painted in a different color.
7.Matte Nail Art:
Matte nail art involves using a matte top coat to create a non-shiny, matte finish on the nails. This can be used to create a subtle, sophisticated look.
8.Water Marble Nail Art:
This technique involves creating a marbled effect on the nails by dipping them into a water and nail polish mixture.These are just a few examples of the many types of nail art techniques available. Experimenting with different techniques can help you discover new and creative ways to decorate your nails.
When it comes to nail art, the color palette is vast and versatile, allowing for endless creativity and expression.
Here are some popular colours and their meanings in nail art:

1.Red:
- Represents passion, love, and courage. It’s a classic color often used for a bold, statement look.
2.Pink:
- Signifies femininity, romance, and playfulness. It comes in various shades from soft pastels to vibrant neon.
3.Blue:
- Symbolizes calmness, serenity, and freedom. It’s a versatile color that can range from light baby blue to deep navy.
4.Purple:
- Represents royalty, luxury, and creativity. It’s a popular choice for adding a touch of elegance to nail art designs.
5.Green:
- Signifies growth, harmony, and freshness. It can be used in various shades to create nature-inspired or bold, statement looks.
6.Yellow:
- Represents joy, positivity, and energy. It’s a bright and cheerful color that can add a pop of color to any nail art design.
7.Black:
- Symbolizes power, sophistication, and mystery. It’s often used for edgy and dramatic nail art looks.
8.White:
- Signifies purity, simplicity, and elegance. It’s a versatile color that can be used on its own or as a base for other colors and designs.
Conclusion:
These are just a few examples of the many colors you can use in nail art. Experimenting with different colors and combinations can help you create unique and personalized nail art designs that reflect your style and personality.
Nail art has come a long way, from something not many people knew about to something loved worldwide. It shows how creative, easy to try, and important to different cultures it is.
People always want to find new ways to show who they are through beauty, and nail art lets them do just that. It’s a fun way for people everywhere to connect over something they all enjoy: colorful and creative nails.
you must watch 👁️👁️ this article 👇👇👇
The Ultimate Guide T0 Summer Nails💅: Trends, Colors, and Care Tips


